Time Zone Viewer
What is Time Zone Viewer?
Time Zone Viewer is windows based software that can be used to view the time of the servers or PCs that you have to work remotely. Addition to that, you will be able to log into remote machine with one click, without typing credentials again and again. All the information is in encrypted format to ensure the security of the remote machine credentials.
How to install?
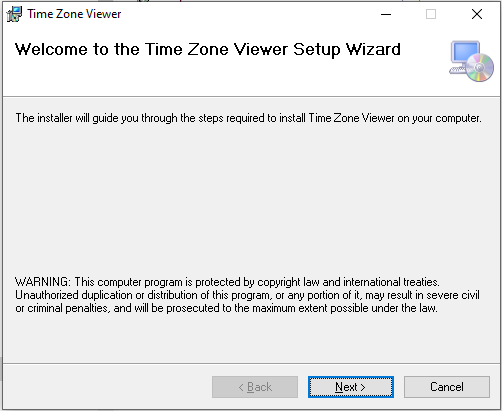
First, visit https://ideajay.com/downloads/#TZViewer , download Time Zone Viewer, double click the setup file and click next
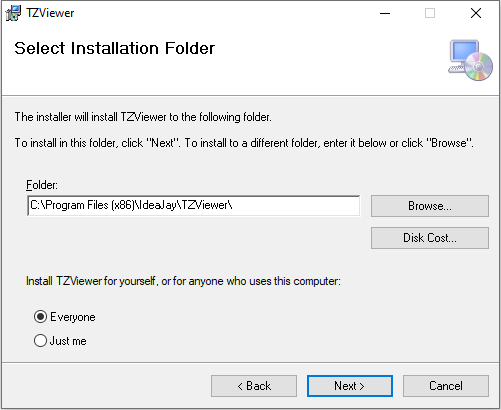
In next window, please select the folder that installation needs to be done.
Finally, click next and finish the installation.
Note
After the successful installation, please grant full permission to the installed folder. (C:\Program Files\IdeaJay\TZViewer)
To grant permission, visit the installed folder and follow the steps below.
- Right click on the folder and select Properties
- Select the Security tab in property window
- Click Edit button
- Select relevant user and give the full control
- Click Apply button
How to work with it?
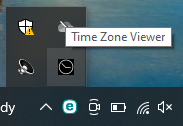
After successful installation, it will be creating a desktop shortcut and configured it as startup application. It will be appeared in application tray in your computer.
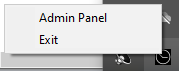
First, right click on the icon and click the Admin Panel.
It will be appeared the admin window that you need to configure your remote machine / server/ computer information.
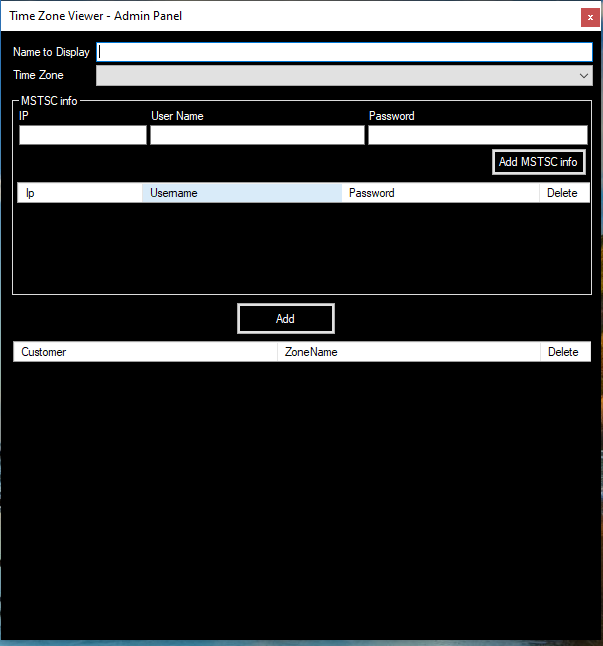
Fill the following information and click to Add button to save the information.
| Name to | Name to identify the remote computer or server |
| Time Zone | Select the time zone that the remote computer or server placed or configured |
| MSTSC Info | Add login credentials of the remote computer or server IP – of the remote computer or server User name – User name of remote computer or server Password – Password of remote computer or server |
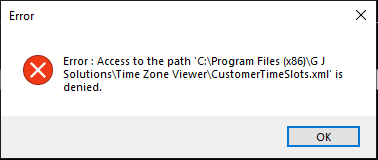
It will be appeared following message after you pressing the ‘Add’ button. To resolve this issue, please grant full permission to mentioned / installed folder.
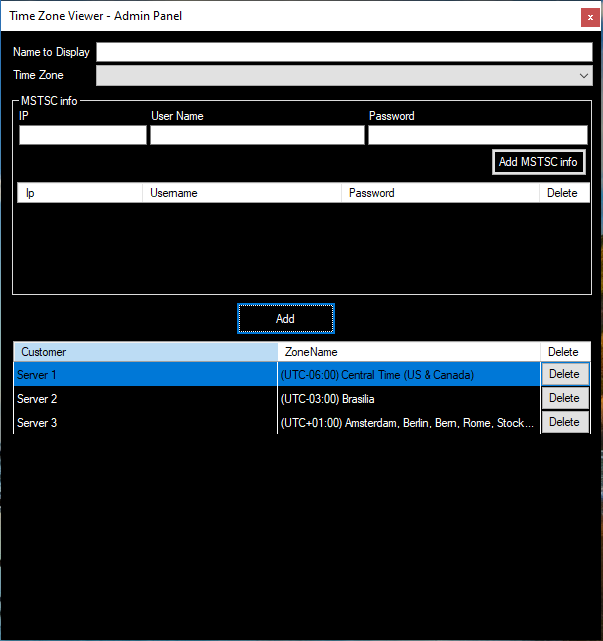
It will be appeared as follow, after adding some information.
To login into configured sever/computer, please click the icon in the application tray. Then it will be appeared as follow. Click Connect button of the relevant entry to access the related server/ computer.
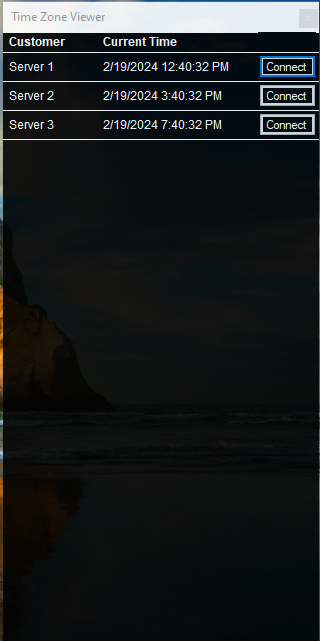
Following screen will appear if there are more than one credentials configured for related remote computer. Please click the user name that you need to access. Then it will load the remote interface that you want.

PDF Text Finder
What is a PDF Text Finder?
Do you need to find a specific word or text within a collection of PDF files? Do not waste time to find those words by opening PDF files one by one. PDF Text Finder is a tool that will suit your requirement. It is windows based software that can be used to search and find a word or text that is contained within a collection of PDF documents.
How to install?
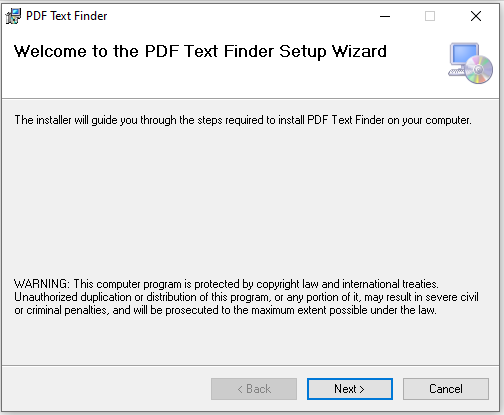
First, visit https://ideajay.com/downloads/#PDFtxt , download the PDF Text Finder and extract the file.
- Install the Microsoft Dot Net 4.6 (MSNet.exe – Download it from here)
- Install the Acrobat Reader (AcroRdrDC.exe – Download it from here)
- Then double click the setup file and click next
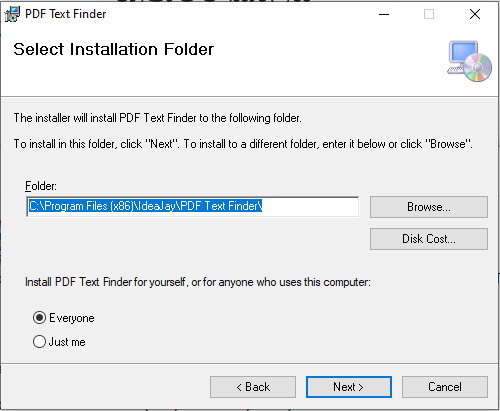
In next window, please select the folder that installation needs to be done.
Finally, click next and finish the installation.
Note
After the successful installation, please grant full permission to the installed folder. (C:\Program Files\IdeaJay\PDF TextFinder)
To grant permission, visit the installed folder and follow the steps below.
- Right click on the folder and select Properties
- Select the Security tab in property window
- Click Edit button
- Select relevant user and give the full control
- Click Apply button
How to work with it?
After successful installation, it will be creating a desktop shortcut and Start menu shortcut. Open the PDF Text Finder and
- Browse the PDF collection that you want to search the text/word
- Insert the word / text that you want to find
- Click the Search button
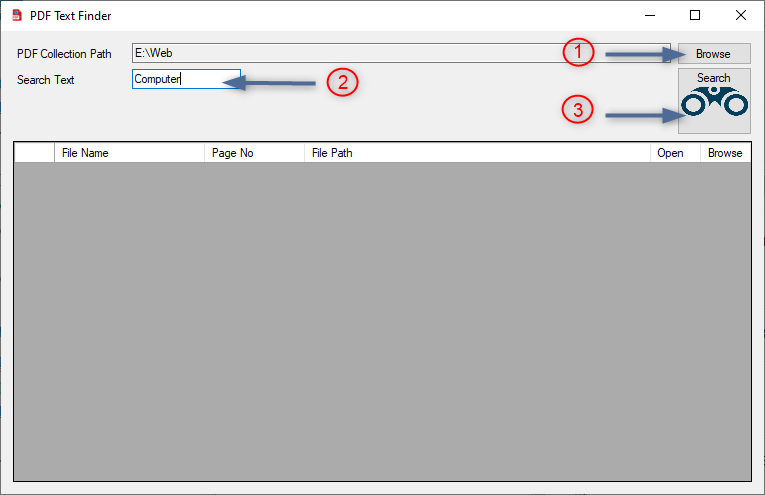
Result will be display on the table
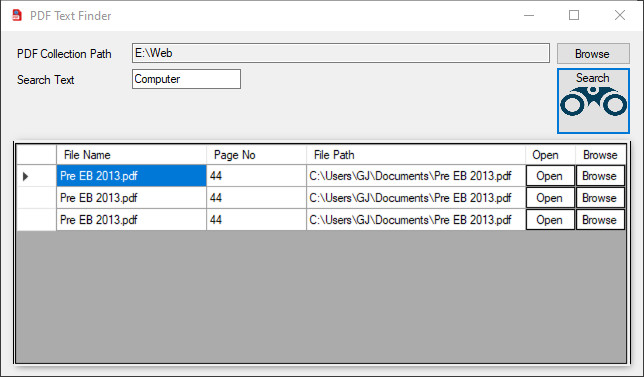
If you want to open the document, click Open button in particular row
If you want to open the file location, click Browse button in particular row
Note
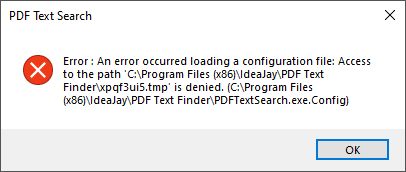
It can be appeared following message after you browsing PDF Collection Path. To resolve this issue, please grant full permission to mentioned / installed folder.
Eazy DAL
What is Eazy DAL?
Easy DAL is windows based software that can be helped to create a Data Access Layer within a few seconds based on your Database that is already created in Microsoft SQL. After successful Data Access Layer (DAL) creation, you will be able to start or update the coding based on the files that were created using Easy DAL.
How to install?
First, visit https://ideajay.com/downloads/#EazyDAL , download the Eazy DAL, double click the setup file and click next.
In next window, please select the folder that installation needs to be done.

Finally, click next and finish the installation.
How to work with it?
After successful installation, it will be creating a desktop icon and start menu item. First you have to connect into a database. There are two options as Quick Connect and Manual Connect. When you use quick connect, the application will be connected to the SQL server or SQL server Express Database that is already configured in local PC/laptop. Using manual option users will be able to connect any instance of SQL Server.
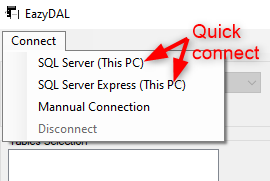
Manual Connection
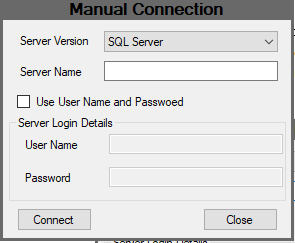
- Select server version /Type (SQL server or SQL server express)
- Enter Server Name (if you wish to connect to a local DB enter the value as .)
- Enter User Name and Password of the SQL server instance
- Click the connect button. If all success, you will be focused in to a main form
After successful connectivity, the main form will be activated as follows.
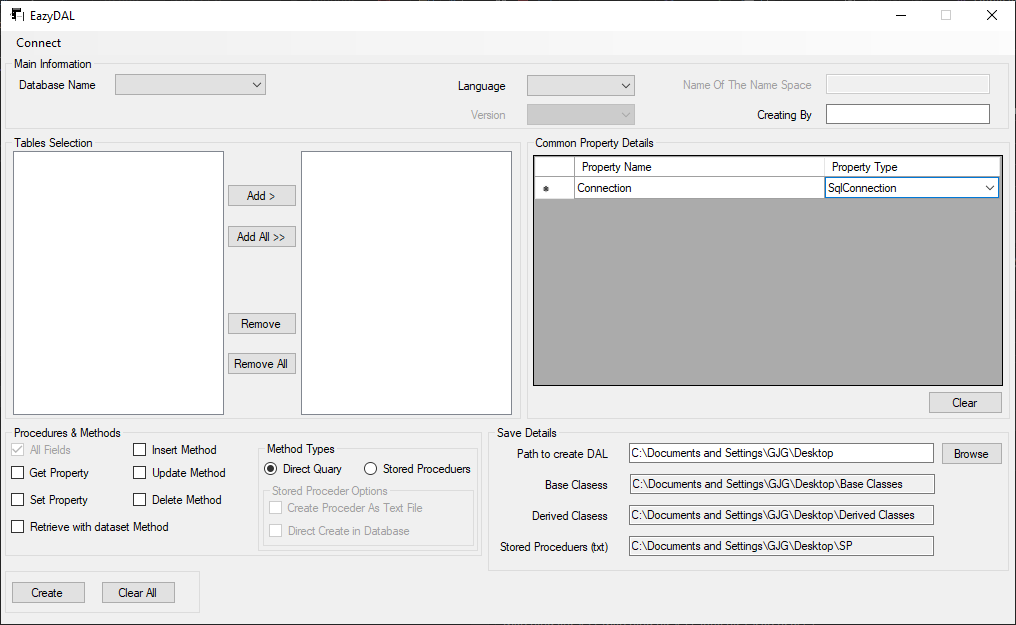
Using the above form, users will be able to create a Data Access Layer (DAL) in one click. For that, please select the relevant options, information and click the Create button. It will create the Base classes, Derived classes and stored procedures related to the selected tables.
| Property / Field | Description |
| Main Information | |
| Database Name | It displays the list of databases that are already in a connected SQL server instance. Users can select the database that they are going to create the Data Access Layer. After the selection, it will list down all the tables in the selected DB in the left hand side white box which is in Table Section. Users can add or remove the tables that they use to create the DAL into the right hand side white box which is in the Table Section. |
| Language | This will support for two languages (C#.net and VB.net). Users will be able to select the language they want. |
| Version | User will be able to select versions of selected language |
| Name of the Namespace | Name of the Namespace that related to the project / functionality |
| Creating By | Name of the person who going to create the DAL |
| Common Property Details | Common properties that you want to add for each classes which going to create under the names of selected tables Ex. Connection string, User Id |
| Procedure and Methods | |
| All Fields | It is not editable and indicates that all the fields of the selected tables are taken to create the Data Access Layer. |
| Get Property | Whether classes need to contain Get method for the properties |
| Set Property | Whether classes need to contain Set method for the properties |
| Retrieve with dataset Method | Whether classes need to contain with a method to retrieve all the data in the tables |
| Insert Method | Whether classes need to contain with a method to insert the data into tables |
| Update Method | Whether classes need to contain with a method to update the data into tables |
| Delete Method | Whether classes need to contain with a method to delete the data from tables |
| Direct Query | Whether the database query that used to get, insert, update and delete to be included within the class as a DB query |
| Stored Procedures | Whether the database query that used to get, insert, update and delete, to be included as Stored Procedures. It contains two options. Users will be able to get related Stored Procedures as separate text files or direct create within the relevant database. Note : When a user selects the option ‘Direct Create in Database’, the database should have the relevant permission to create those procedures. |
| Save Details | |
| Path to create DAL | User will be able to browse / select the folder or location that need to be created the relevant DAL classes and stored Procedures |
| Base Class | Path that going to be created the Base class collection |
| Derived Class | Path that going to be created the Derived class collection |
| Stored Procedure (txt) | Path that going to be created the Stored Procedure collection as text files |
Private Cheque Printer
What is a Private Cheque Printer?
If you are a person from a small company who works with cheques. This windows based application will help to print your cheques clearly with adjustable field sets using your own printer. It will provide usable history too.
How to install?
First, visit https://ideajay.com/downloads/#Cheque and download the Private Cheque Printer, double click the setup file and click next
In next window, please select the folder that installation needs to be done.

Finally, click next and finish the installation.
Note
After the successful installation, please grant full permission to the installed folder. (C:\Program Files\IdeaJay\Cheque Printing)
To grant permission, visit the installed folder and follow the steps below.
- Right click on the folder and select Properties
- Select the Security tab in property window
- Click Edit button
- Select relevant user and give the full control
- Click Apply button
How to work with it?
After successful installation, it will be creating a desktop icon and start menu item. Just double click it and the user will be able to view the following form. Users can fill in the relevant information and click the Print button.
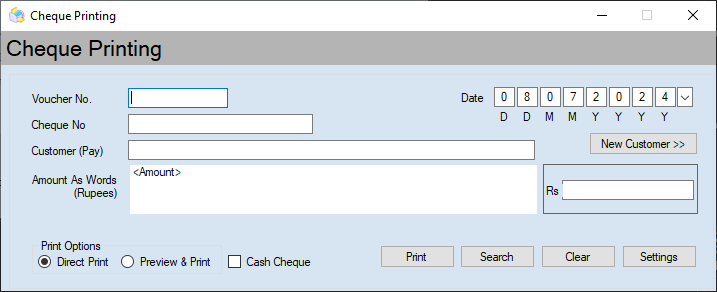
| Property / Field | Description |
| Voucher No | This number for the helping purpose |
| Cheque No | Cheque number that going to be print |
| Customer | Name of the person that address the cheque |
| Amount | Amount of the cheque. When you enter the amount, this will be converted it as word automatically |
| Print option | |
| Direct print | When the user clicks the Print button with this option, it will go to the printer without previewing it. |
| Preview and Print | When the user clicks the Print button with this option, it will preview the cheque before go to the printer. |
| Cash Cheque | Please click this box if it is a Cash Check. It will provide additional area to put the signature. |
| Date | Date of the issue |
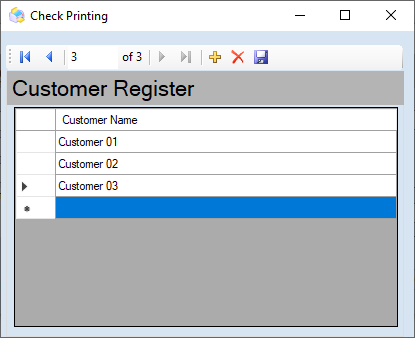
Users can save the customer or persons who issue the cheques very often, by clicking the New Customer button. Then, the following screen will appear to manage the names of the payees.
| Button | Description |
| Add | This number for the helping purpose |
| Delete | Cheque number that going to be print |
| Save | Name of the person that address the cheque |
| If the user wants to edit any name, please double click edit and click Save button. |
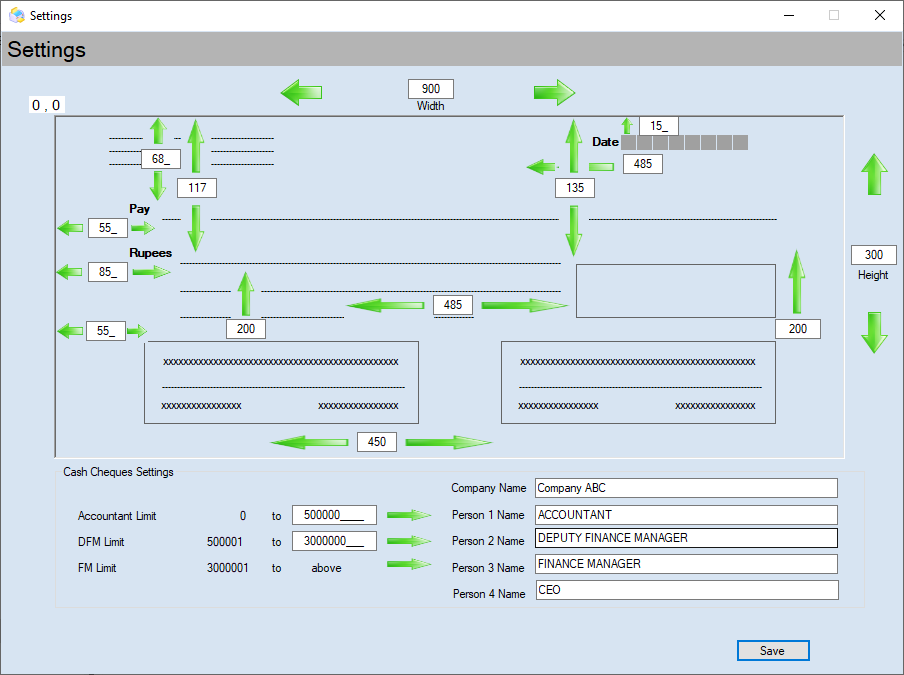
Using the Setting form (Click Settings button) the user will be able to adjust the text alignment against the real cheque. After doing the changes the user needs to click the Save button.